You can’t bolt a screen to a wall and expect magic to happen. That’s where most setups fall flat. Poor placement. Clunky mounting. Washed-out visuals. Then comes the “Why doesn’t it look like the demo?” moment.
The Samsung QMC display has the potential to grab attention and hold it. But to get the most out of it, you have to set it up right—and fine-tune what shows up on screen. Skipping this step? You may as well put a blanket over the display.
We’ll walk you through the smart way to get your Samsung QMC installed, optimized, and ready to impress—without any guesswork.
This article covers:
- How to pick the right location to get the most eyes on your screen
- Mounting options that keep your display secure and looking sharp
- A step-by-step walkthrough of the Samsung QMC installation process (no fluff, no jargon)
- Settings that improve viewing quality and screen performance
- How to manage content like a pro using the right software integrations
By the end, your QMC won’t look good—it’ll work hard for you. Let’s get into it.
Why the Samsung QMC Series Stands Out
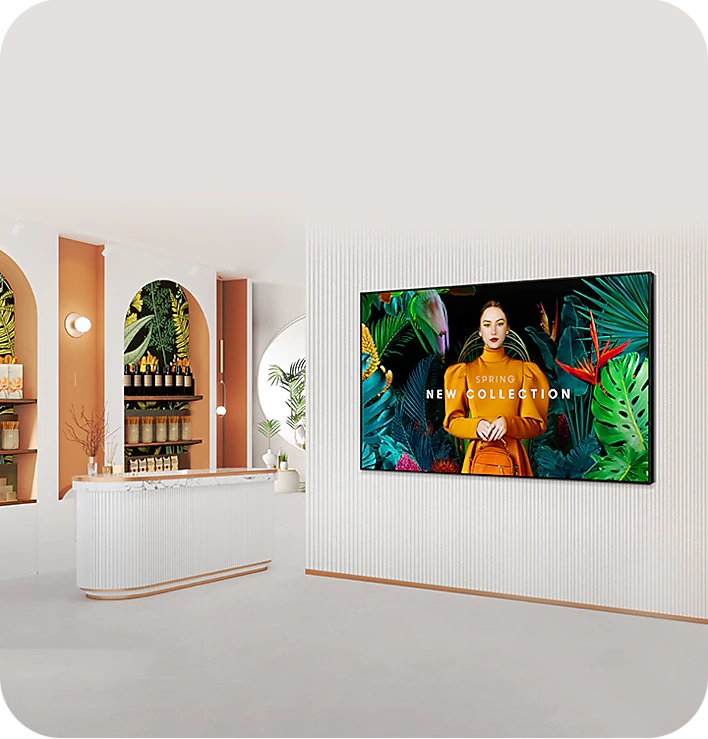
There’s no shortage of commercial displays on the market. But the Samsung QMC Series hits different. It’s not about flashy features that sound good on a spec sheet. It’s about real performance—slim design, clean visuals, and smart functionality packed into a professional-grade screen.
Here’s what makes the QMC Series worth your attention:
- Ultra-slim depth – With a 28.5mm profile, the QMC hugs the wall and keeps the focus on the content, not the hardware. Perfect for sleek, modern interiors where space matters.
- Non-glare display – Whether you’re under bright overhead lighting or dealing with sunlight through a window, the QMC keeps reflections to a minimum and text sharp enough to read from across the room.
- 4K UHD resolution – Crisp, clean visuals with lifelike clarity. Whether you’re showing branded content, data dashboards, or promotional material, you get sharp detail that doesn’t wash out.
- Versatile sizes – The QMC series offers exceptional versatility with screen sizes ranging from 32″ all the way up to 98″ (available in 32″, 43″, 50″, 55″, 65″, 75″, 85″, and 98″). This extensive selection ensures you can find the perfect fit for any space, from small meeting rooms to large lobbies, matching the screen size precisely to your environmental needs and visual goals.
- Dynamic crystal color technology – The QMC Series enhances contrast and color richness through dynamic crystal color technology, making every visual element stand out with improved depth and sharpness.
- Quantum processor lite 4k – Backed by the quantum processor lite 4k, the QMC ensures content renders quickly and accurately without delay—even when switching between high-resolution video or static media.
- Clear and vivid displays – Whether you’re viewing static graphics or full-motion media, the result is consistently clear and vivid displays that look sharp from any angle.
- Portrait mode – If your content is vertical, the QMC supports portrait mode without sacrificing layout integrity or resolution—ideal for digital directories or vertical signage.
- Energy efficiency – Its internal power management system is designed for energy efficiency, keeping long-term usage costs low without compromising brightness or display performance.
- Smart calibration – Use smart calibration tools to fine-tune color, brightness, and contrast based on your environment, ensuring accurate display across every screen and location.
This isn’t a display you toss into a space and forget about. It’s built for impact—but only if you install and configure it the right way.
Where You Place the Screen Can Make or Break It
A flawless display means nothing if no one looks at it. And more often than not, poor screen placement kills engagement before the content even gets a shot. Let’s fix that.
When you’re deciding where to install your Samsung QMC display, focus on visibility, foot traffic, and light exposure. These three factors work together to either push your message forward or bury it.
Aim for High-Traffic Zones
Start by watching where people move. Screens work best where eyes naturally go:
- Entrances – This is where you grab attention fast. As people walk in, your screen should give them a reason to stop or look twice.
- Checkout counters – While they wait, they watch. Use that pause to feed them promotions, announcements, or quick brand messaging.
- Meeting rooms or conference spaces – For internal use, these displays make a big impact when used for agendas, key talking points, or branding.
If you’re not placing the screen where people already linger, you’re forcing your content to compete with distractions.
Keep It Out of Direct Sunlight
Sunlight and screens don’t get along. Even with the QMC’s non-glare coating, strong natural light can wash out your content, making text hard to read and visuals lose their punch.
Here’s what to watch for:
- Windows directly across from the display – These bounce light straight into the screen. The result? A foggy, low-contrast mess that’s tough on the eyes.
- Skylights or tall glass doors nearby – These bring in sunlight that shifts throughout the day, making your display unpredictable unless you control the environment.
- Midday exposure – Between 11 AM and 3 PM, sunlight tends to hit hardest. If your screen faces any direct exposure during that window, expect issues with glare, color distortion, and visual fatigue.
Instead of placing the display wherever there’s wall space, scope out the lighting conditions across a full day. Watch how light moves across the room. If you spot direct hits, reposition the screen or install anti-glare window films, shades, or blinds.
The goal is simple: preserve contrast, protect clarity, and reduce reflection. That way, your content pops—no matter what time of day it is.
Mount It at the Right Height
Here’s a practical rule: position the screen so the center sits around eye level—typically 55 to 65 inches from the floor in public spaces.
Let the use case guide you:
- Retail or lobbies: Go slightly higher (65–70″) for a better line of sight in open areas.
- Seated environments like waiting rooms or conference tables: Drop it lower (50–55″) to keep the viewing angle comfortable.
- Menu boards or directional signage: Place it above head height (70–80″) to keep it visible without blocking movement.
Mounting too low leads to neck strain. Mounting too high makes people ignore it. Find the sweet spot, and the content starts pulling people in without effort.
Mounting Options That Match the Space and the Stakes
A premium screen deserves a smart setup. The way you mount your Samsung QMC doesn’t just affect stability—it shapes the entire viewing experience. Choose the wrong option, and the display can feel out of place or even go unnoticed. Choose the right one, and it blends into the environment while pulling focus exactly where you want it.
Let’s break down the three mounting approaches that professionals use most:
Wall-Mounted Displays
Wall mounting is the go-to for a reason. It keeps the display flush with the surface, saves floor space, and gives a clean, polished finish. With the QMC’s ultra-slim profile, you get a modern, low-profile look that doesn’t stick out—literally or visually.
Use this option when:
- You want to make use of vertical space without adding clutter
- The display will stay in a fixed spot long term
- You’re working in retail, healthcare, offices, or hallways with clear sightlines
Keep the cable management tight. Exposed wires kill the visual appeal fast.
Ceiling-Mounted Displays
If you’ve got high ceilings or wide-open areas, this option makes the most of your overhead space. It works especially well in transportation hubs, event venues, or large lobbies where walls are too far from foot traffic.
Use this option when:
- You need the screen to be visible from multiple angles or long distances
- The floor plan is open, or the wall layout doesn’t allow fixed displays
- You want to avoid blocking movement or interfering with wall decor
Make sure the mount is load-rated for the QMC’s size and weight—and double-check your ceiling structure before you drill.
Freestanding Display Stands
Need flexibility? Go with freestanding. These mobile stands let you test different placements, shift content strategy with ease, or set up temporary screens for events or pop-up installations.
Use this option when:
- You need to move the screen between rooms or locations
- You’re running short-term campaigns or rotating promotions
- You want a non-permanent option with plug-and-play simplicity
Look for stands with lockable wheels and built-in cable routing. A tidy Samsung QMC setup boosts credibility and makes your message easier to trust.
Step-by-Step Setup That Gets It Right the First Time
Installing a Samsung QMC display isn’t complicated, but it does require precision. If any part of the process gets rushed or skipped, the screen’s performance (and lifespan) can take a hit. This walkthrough covers everything from unboxing to first signal, with the technical care the display deserves.
Here’s how to set it up the right way.
Step 1: Unboxing and Safety Precautions
Before touching the screen, prep your space and your team.
Workstation Prep:
- Use a wide, flat, clean surface padded with foam or anti-static cloth.
- Ensure you have enough clearance to rotate and inspect the unit fully.
Handling the Unit:
- Always lift with two people. Support the display from the sides using the built-in handgrips—never apply pressure to the panel itself.
- Avoid stacking any other components or tools on top of the panel, even briefly.
- Leave the protective film on the display until after the final mounting to prevent scratches during handling.
Inspect the Packaging:
- Check for any signs of damage to the box, corners, or straps.
- Note the serial number for inventory and service tracking before discarding the packaging.
Safety Callout: Use grounded ESD straps if working on the display’s internal ports or near circuit inputs during testing or diagnostics.
Step 2: Choose and Prep the Mounting Hardware
Mounting starts with choosing the correct bracket and ends with a load-tested, permanent hold.
Mounting Type Compatibility:
- The QMC Series supports VESA standard mount patterns:
- 43″/50″ = 200 x 200 mm
- 55″/65″ = 400 x 400 mm
- Weight specs vary by model, so check Samsung’s spec sheet to verify the load-bearing capacity required.
Wall-Mount Setup:
- Use a stud finder to locate wall studs. For masonry, use anchors rated for the display’s weight.
- Drill pilot holes at marked points, then secure with lag bolts or toggle anchors.
- Use a laser level to ensure perfect horizontal alignment before bolting in fully.
Ceiling-Mount Prep:
- Verify that the ceiling structure can handle the dynamic weight load plus mounting gear.
- Use seismic-rated hardware in areas with code compliance requirements.
- Route any overhead wiring before securing the bracket to minimize strain later.
Freestanding Stands:
- Opt for stands with an internal cable raceway and a weighted base.
- Confirm compatibility with QMC VESA pattern and center-of-mass alignment.
Step 3: Screen Positioning and Mounting
Now that your bracket or stand is secure, it’s time to mount the display.
Attaching Mount Arms:
- Line up the mounting arms with the display’s threaded inserts.
- Use the included screws only—substituting with longer screws can damage internal components.
- Use torque-limiting screwdrivers if possible to avoid overtightening.
Lifting the Display:
- Use two people to lift and hook the display into the mounted bracket or stand.
- Engage any locking mechanisms—spring latches, safety screws, or brackets—before letting go.
Alignment Check:
- Use a digital inclinometer or bubble level to verify pitch and yaw.
- Measure all sides to ensure screen symmetry if mounting in a tiled or side-by-side configuration.
Step 4: Route the Cables and Set Up Power
A clean cable run improves airflow, protects connections, and prevents visible clutter.
Video/Data Cable Routing:
- Use HDMI 2.0 or higher for 4K content at 60Hz without compression.
- Secure cables to the mount or conduit with velcro straps or cable ties—avoid over-tightening.
- Keep low-voltage (data) and high-voltage (power) cables in separate paths to reduce interference.
Power Supply Considerations:
- Plug the display into a UL-listed surge protector or power conditioner.
- For commercial installations, use a dedicated circuit with clean grounding.
- Avoid daisy-chaining multiple displays on one power strip.
Port Clearance:
- Use angled or low-profile connectors if space is tight between the wall and I/O ports.
Step 5: Connect the Display to Content Sources
The QMC supports multiple input types. The goal here is compatibility, flexibility, and stability.
Available Inputs:
- HDMI (3x) – For digital signage players, laptops, or AV systems
- USB-A (2x) – For playback of local media files
- LAN Port – For secure, hardwired network connection
- Wi-Fi – Internal antenna supports wireless networking via Tizen OS
Source Prep Tips:
- Use high-speed certified HDMI cables to avoid handshake issues and black screens.
- Label each input source with cable flags—this helps during troubleshooting or input switching.
- Use shielded CAT6 cables for LAN to reduce packet loss or interference in high-traffic networks.
Auto Input Detection:
- Enable auto-source switching via Tizen settings if you’re rotating between devices.
Step 6: Connect and Pair the CrownTV Player
- Connect Hardware: Plug the CrownTV player into the Samsung QMC display’s HDMI port (use a certified high-speed cable), connect the player to your network (Ethernet preferred), and connect its power adapter.
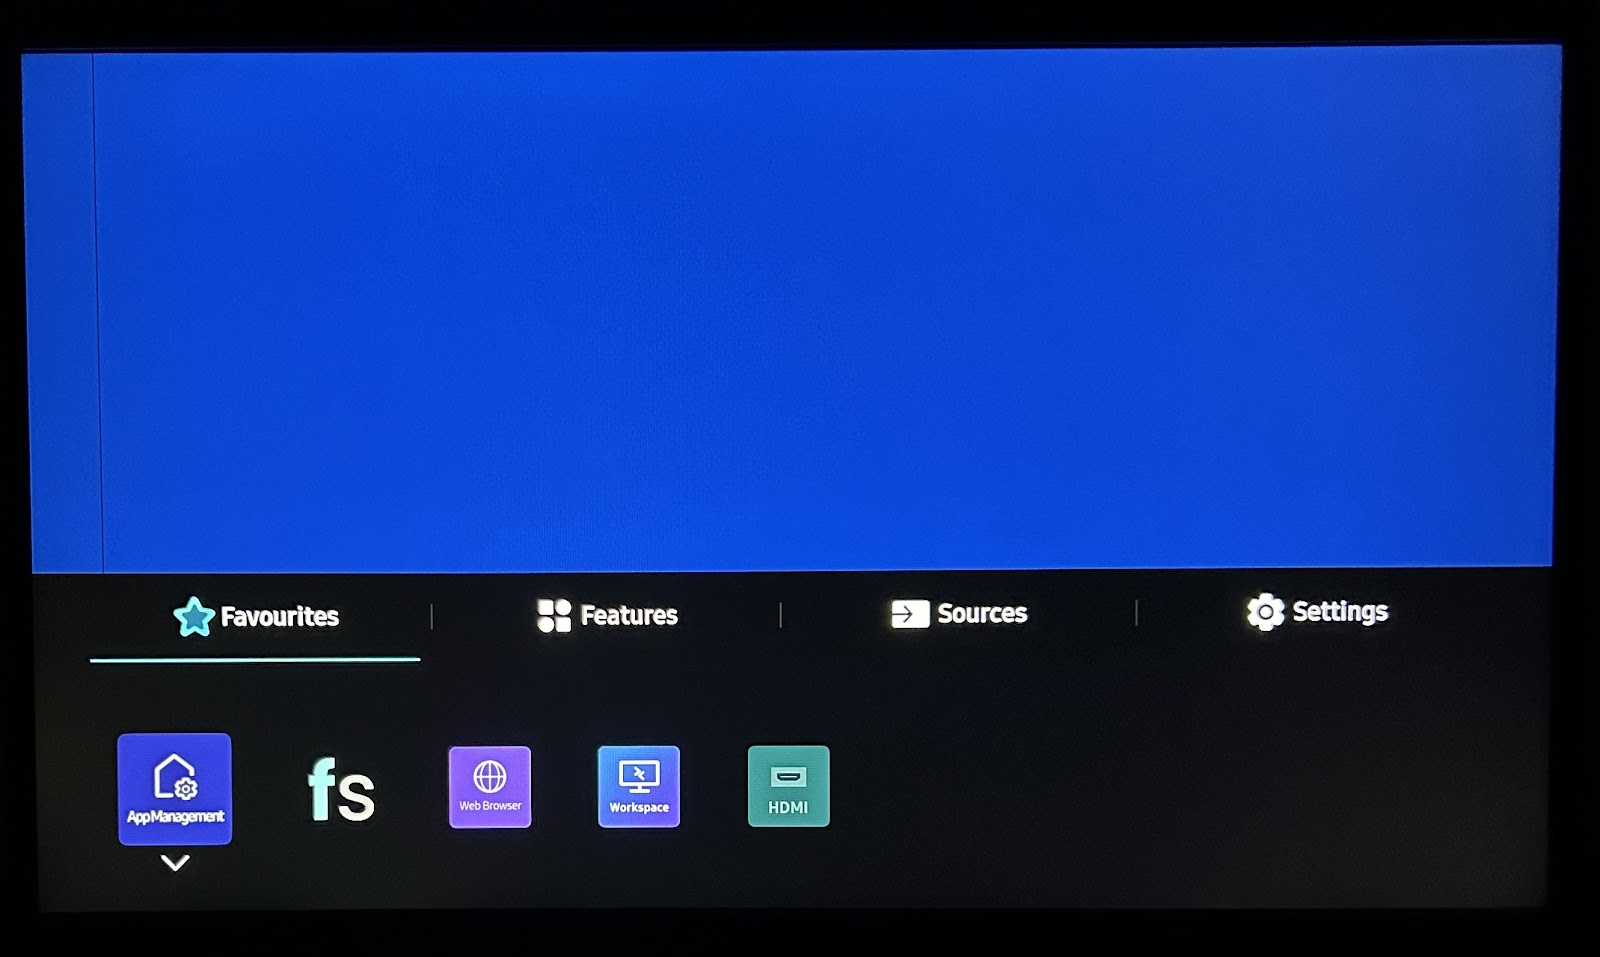
- Select Input: Power on the QMC display. Use the Samsung remote to select the HDMI source connected to the CrownTV player. Then, power on the player itself.
- Pair with Dashboard: Follow any initial on-screen prompts from the player. Log into your CrownTV dashboard on a computer, navigate to add a new player/screen, and enter the pairing code shown on the QMC display. Assign a name to the screen in the dashboard.
- Optimize QMC: On the Samsung display, go to Settings > External Device Manager and enable Input Signal Plus (or HDMI UHD Color) for the player’s HDMI port. Also, go to Settings > Eco Solution and disable Auto Power Off and similar power-saving features to prevent playback interruptions.
- Verify: Confirm the player shows as ‘Online’ in your CrownTV dashboard. Send a test image or playlist to verify the connection and display function.
Step 7: Final Display Check
Before signing off, walk through a full system check.
Visual Performance:
- Run a full-screen gradient or 4K demo reel to check for pixel burn, dead zones, or color banding.
- Inspect for edge bleeding, backlight inconsistency, or brightness drop-off.
Viewing Angles:
- Stand at various points in the room. Content should remain sharp and legible from off-axis positions, especially in commercial environments.
System Check:
- Verify that all input sources are detected.
- Confirm network stability if using Wi-Fi or LAN.
- Monitor playback performance—no flickering, freezing, or sync issues.
Final Touches:
- Clean the panel with a microfiber cloth—never use alcohol or ammonia-based cleaners.
- Lock the remote in a secure drawer or cabinet if the display is in a public area.
Once everything looks locked in, you’re done.
Fine-Tune These Settings to Get the Best Out of Your Display
Out of the box, the Samsung QMC looks sharp—but default settings don’t always match the lighting, layout, or content style of your specific space. To get the most out of the screen, you’ll need to step past the basics and into the settings that actually move the needle on clarity, sharpness, responsiveness, and overall screen performance.
Here’s what to configure—and how to do it right.
Adjust Brightness and Contrast for Indoor Environments
Indoor brightness requirements vary based on ambient lighting conditions, but the goal is consistent: optimize screen readability without eye strain or color distortion.
Brightness Settings:
- For moderately lit indoor spaces, set brightness between 300–400 nits.
- In bright retail environments with natural light, consider raising it to 500 nits, but avoid maxing out unless absolutely necessary to preserve panel lifespan.
Contrast Settings:
- Use test images with black-to-white gradients.
- Adjust the contrast until blacks appear deep without crushing shadow detail and the whites stay clean without blooming.
Recommended Practice: Run an ANSI checkerboard pattern test to assess luminance balance across zones.
Calibrate Color Temperature and White Balance
Color accuracy influences brand perception and message clarity. Misaligned white balance introduces color bias that skews visuals—especially on skin tones, logos, or printed materials displayed digitally.
Color Temperature Recommendations:
- Use 6500K (D65 standard) for most environments; it balances warm and cool tones.
- For colder-toned environments (fluorescent lighting), raise it slightly to 7000–7500K.
- For warmer ambient tones (wood finishes, warm LEDs), reduce to 5500–6000K.
Manual White Balance Calibration:
- Access the advanced settings menu to manually fine-tune Red, Green, and Blue Gain and Offset.
- Use a colorimeter or spectrophotometer for precision. Display a full white screen and compare measured Kelvin value against desired output.
Tip: Match the display’s color temperature to your lighting profile (CCT) for visual harmony.
Set Sharpness Without Introducing Artifacts
Over-sharpening is a common mistake that introduces unwanted visual effects like haloing, edge enhancement, or digital noise.
Best Practice:
- Start with a sharpness setting between 10–20 (on a 0–100 scale).
- Use a high-resolution test image with fine lines and serif fonts.
- Gradually increase sharpness until edges remain defined without ghosting.
Advanced Tuning: Disable “Dynamic Contrast” and “Noise Reduction” if using third-party scaling hardware — these can conflict with external processors and result in edge artifacts.
Choose the Right Content Format
Each content type imposes different demands on display hardware. Poor formatting can lead to latency, pixelation, or frame drops.
Static Images:
- Format: PNG (lossless) or high-quality JPEG (90% compression or higher)
- Resolution: Native 3840 x 2160 for QMC 4K panels
- Color profile: sRGB or Adobe RGB, depending on source accuracy
Videos:
- Format: MP4 (H.264 or H.265 codec) for optimal compression with minimal loss
- Frame rate: Use 30fps for general signage, 60fps for sports or high-motion content
- Bitrate: Cap at 20–25 Mbps for USB/local playback, 10–15 Mbps for network streaming
Live Data Feeds:
- Use HTML5-based widgets to pull content from secure sources
- Implement JSON or XML data feeds with caching to avoid over-querying APIs
- Avoid full-screen refreshes—use incremental DOM updates for smoother performance
Configure Scheduled Content Updates
Reliable playback depends on smart scheduling, especially when managing large volumes of time-sensitive or rotating content.
Setup Workflow:
- Load content into internal memory or CMS platform
- Use the built-in scheduler or external CMS to define:
- Start/end time
- Frequency (daily, weekly, recurring)
- Priority (override or fallback)
Recommended Best Practices:
- Schedule updates during off-hours (midnight–5 AM) to avoid live interruptions
- Assign failover content for each time slot in case of file corruption or network outage
- Use naming conventions and content logs to avoid duplicate push errors
Tip: Sync the display’s internal clock using NTP (Network Time Protocol) for precise timing.
Enable Motion Smoothing Carefully
Motion enhancement settings are often misunderstood. When used incorrectly, they introduce soap-opera effects, stutter, or unnatural frame blending.
When to Use:
- 24fps footage (e.g., cinematic videos or theater trailers)
- Camera feeds that show motion blur due to slow shutter speed
How to Configure:
- Use the “Auto Motion Plus” setting
- Set Blur Reduction to 5–7
- Set Judder Reduction to 3–5
- Disable for animated graphics, presentations, or digital signage content—these don’t benefit and often degrade in appearance
Disable Eco and Auto-Save Modes for Commercial Environments
Energy-saving features prioritize efficiency over display consistency. In professional installations, they cause fluctuations in brightness, latency in wake-up, and reduced responsiveness.
Turn Off:
- Eco Saving Plus can cause brightness inconsistencies over time
- Screen Saver Settings — unnecessary for always-on applications
- Auto Power-Off — may trigger unplanned shutdowns in CMS-controlled environments
Bonus Tip: Turn off “Auto Source Switching” unless you’re using rotating input sources that need hot-swapping.
Configure Input Detection and Failover
For multi-source installations or content-critical displays, failover support is key. It ensures uninterrupted playback even when the primary input fails.
Steps to Set Up:
- Plug in all intended content sources (e.g., HDMI1 as primary, USB as secondary)
- Access Source Settings > Auto Source Switching
- Enable Auto Detection and assign fallback input order
- Set the Source Detection Delay to 3–5 seconds to allow time for reconnection before switching
Test Each Scenario:
- Unplug the primary source to confirm the automatic switch
- Power cycle the display to validate input memory retention
Tuning these settings the right way doesn’t take long, but the payoff is major. Better visuals. Smoother playback. Longer display life.
Manage Content Like a Pro with the Right Software Stack Like CrownTV’s Dashboard
Installing the display is half the battle. The real performance begins when your content is fed, scheduled, and maintained through the right content management system. Without streamlined content management, even the best screen ends up showing the wrong message—or worse, nothing at all.
Samsung’s QMC Series is compatible with a wide range of third-party platforms. But if you’re aiming for precision, flexibility, and reliable performance, it’s worth integrating a system built specifically for the demands of a business environment.
Why Software Integration Matters?
Hardware is only as good as the platform behind it. Without proper software control, you’ll run into:
- Playback errors and formatting issues
- Broken content schedules
- Manual update headaches
- Untracked failures that go unnoticed until someone complains
To prevent that, you need a dashboard that lets you load, schedule, monitor, and troubleshoot your display content in one place—with minimal effort and zero guesswork.
CrownTV’s Dashboard Works Seamlessly with Samsung QMC Displays
For those looking to get professional-grade control over their QMC Series displays, CrownTV’s digital signage dashboard is built to handle the job—and then some.
Here’s how it fits into your setup:
Centralized Content Scheduling and Display Management
CrownTV gives you full control over your Samsung QMC content with:
- Custom playlists that rotate media by time of day, day of week, or by display group
- Drag-and-drop scheduling across multiple displays, locations, or departments
- Remote content updates so you never have to be on-site to make a change
- Real-time screen previews to confirm what’s live and what’s next in the queue
The interface features an upgraded home screen UI, making it easier for users to access key functions without digging through layers of configuration menus. Everything you need is accessible from the same screen, eliminating context switching and speeding up workflows. It also supports enhanced internal solutions, letting teams sync their visual communication strategy with internal apps, tools, or scheduling platforms already in use.
This system cuts out the manual work, keeps campaigns aligned, and gives teams an intuitive backend that doesn’t require IT experience to operate.
Installation Support That Covers the Tech Gaps
You’ve already walked through the setup process. But if you’d rather hand off the technical lifting, CrownTV offers professional installation services built around optimal Samsung QMC performance.
This includes:
- Display calibration for content-specific brightness, contrast, and resolution
- Network configuration for secure, remote access
- Physical screen alignment and cabling designed for clean, scalable setups
- Testing failover inputs, playback verification, and admin access control
That means no setup guesswork—and no post-installation surprises.
Fully Compatible with CrownTV’s Media Player
Pairing the QMC with CrownTV’s signage media player gives your system the speed, storage, and processing power to handle heavy workloads and advanced visuals.
Use it to:
- Play high-resolution video without buffering
- Store large media libraries locally for offline fallback
- Sync content playback across multiple screens with frame-level accuracy
- Automatically reboot and relaunch scheduled content in case of power loss
The player connects via HDMI and LAN to Samsung’s QMC display and integrates directly with the CrownTV dashboard for full system control.
This is where software meets screen—and starts working for you. When the system is dialed in from end to end, you can focus less on managing tech and more on driving results.
The Bottom Line: Get the Most Out of Your Samsung QMC Display
Setting up a Samsung QMC display isn’t plug-and-play if you care about quality. But now, you’ve got every tool, tip, and tactic needed to install it properly, tune it to your environment, and keep it running at full performance. That’s a win worth locking in.
Whether you’re mounting it in a high-traffic space or syncing your content across multiple locations, you’ve handled the technical side like a pro. Here’s a quick rundown of what we covered:
- How to choose the right location for visibility, comfort, and content impact
- Smart mounting options that align with your environment and security needs
- A full technical breakdown of the digital signage installation guide/process—from unboxing to power-up
- Settings that sharpen performance and maintain screen quality over time
- Content formatting and playback tips that actually match what the display can handle
- Professional-grade software integration for centralized content control and automation
The QMC Series is built to perform, but to keep it working hard for your space, you need a backend that can keep up. That’s where CrownTV comes in. From seamless software integration to installation support and media player compatibility, CrownTV makes the entire process simpler, sharper, and more scalable.